With my first baby, Hudson, I breastfed for somewhere-around-3-weeks and then gave up after mastitis attacked! I just wasn’t doing everything properly and didn’t even know it.
With my second baby, Everleigh, I decided to exclusively pump. We breastfed in the hospital for 3 days but then immediately went to pumping at home. I had a GREAT experience with it and did it easily through her first year.
The Benefits:
- I didn’t get any engorgement issues because I could pump it all out “on-demand”.
- No breast/bottle nipple confusion.
- Build up a supply for nights out (nights off!)
- Know your supply so you can know when you can quit.
- Know exactly how much baby is eating (this was important to me because I’m pretty crazy and needed know that she was getting the exact amount she needed!)
The Disadvantages:
- You have to pump a lot, but it becomes a routine (and you ultimately end up only pumping 2x/day).
- Some say you don’t get the “breastfeeding bond”, but I still held my baby close and fed her and cuddled, so I think this is 100% a non-issue.
- You have to have a place to store your fresh & frozen milk.
- You have to purchase storage bags (inexpensive…).
- You have to purchase bottles.
Pictures of milk & equipment
The Pump
Almost all insurance companies will pay for a free breast pump for you! Most do make you wait until the baby is actually born and your doctor will probably have to send in a form for you. I started the process before her birth and then I received the pump about 7-10 days after she was born.
I bought my own pump, too, so I could keep one at work and one at home by my bed. Both were MEDELA DOUBLE PUMPS and it was easy & conveneient.
I also bought 1 Medela Manual Hand Pump for traveling (though I still took my regular pump, too). I used the Hand Pump in the airport if we had a long traveling time. It honestly did not take me much longer to use this than it did to use the electric pump!
I used both of these pumps. They’re both the same pump (Medela In-Style) but the one on the right is in a travel bag. I kept that one at work because I could store my freezer pouches in there.


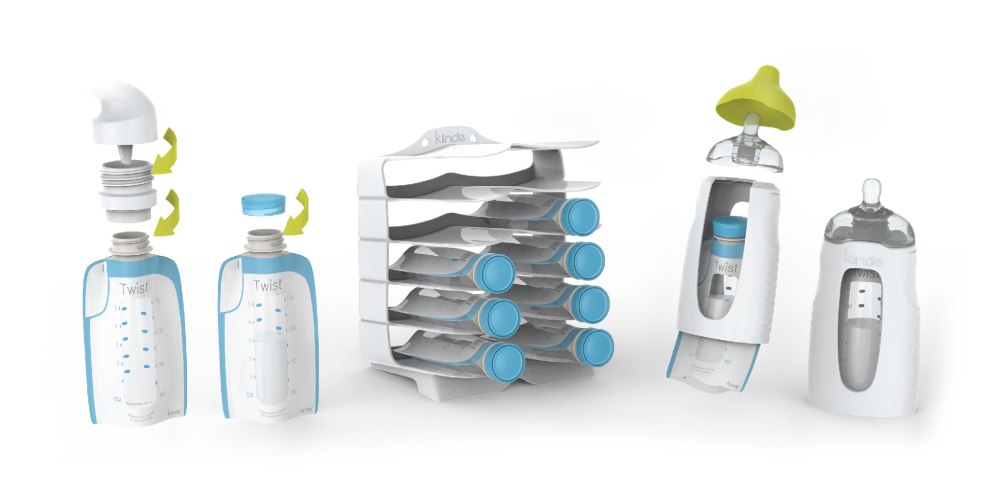
The System
My favorite system to use for pumping the KIINDE system. What I love about this is the convenience. As a new mom, convenience was my top priority! You can pump directly in to these bags (though I did NOT because I felt like the measurements were more accurate on the Medela Bottles) and you can refrigerate/freeze them AND you can FEED directly from them!!
The nipples that pop on to the storage pouches are AMAZING. They’re the perfect flow and come in 3 different sizes (slow, medium, and fast). It makes it incredibly easy to just pull a bag out of the fridge, heat it up, and pop a nipple on it. The bottle case that goes around the pouch is also SO SIMPLE for the babies to hold!
However, if your baby doesn’t like this nipple you can use the attachments to put a different nipple on it.
What I Purchased:
- 6 oz pouches for the first few months (they aren’t reusable so you’ll need enough 4oz ones for 6 bottles/day until baby starts eating more amounts per bottle… maybe 500 pouches? 3 months worth?)
- 8 oz pouches for the rest of the time
- 4 active-latch slow nipples
- 4 active-latch medium nipples
- 2 active-latch fast nipples
- 3 “bottle” cases
- Bottle Warmer (I like their warmer a lot, but it is NOT good for on-demand feeding because it takes 7 minutes. I did a schedule, so this was fine for me as I didn’t have a screaming baby waiting on the bottle – I prepared it right before it was time to eat)
- Organizer (I only bought one and used it in the fridge)
How I Did it:
In the first few weeks, I pumped every 2-3 hours around the clock to establish my supply. I was up with baby girl at this time anyway, so it wasn’t hard. The milk stays good in room temperature for 6-10 hours, so I would pump 2 sessions before I would get up and refrigerate them. I would also feed baby one of these recently pumped bottles so I didn’t have to get up and make her one. So it was all still very simple & lazy for me 😉
Logging your Data
I used the baby app BABY-CONNECT to log all of my pumping sessions so that I would know how much I was making. This helped me know if I was under-producing and needing to do something to increase my supply.
This is also the app I use to track my babies’ sleeping, eating, and medical information, so I’m on the app a lot anyway!


Washing the Pump Parts
To save myself time (& so I didn’t have to dishes every few hours) I kept my pump-parts in the refrigerator and used those same ones for 5-7 days before washing them and using new ones. I would just do a quick rinse and put them in the refrigerator! This keeps the milk on it from getting bacteria, so you can still use those same pieces. MUCH simpler than washing all the pump parts every time!
How much/often I Pumped:
- At First: In the first 2 weeks, I was pumping about 2-3 ounces per session, pumping 8x/day approximately.
- 2 weeks: pumping 10 ounces/session, pumping 5x/day (6am, 10am, 2pm, 7pm, midnight)
- 2 months: pumping 10 ounces/session, 4x/day
- 5 months: pumping 10 ounces/session, 3x/day (my supply started decreasing so I supplemented with Fenugreek 4x/day and that increased my supply dramatically)
- 6 months: pumping 15 ounces/session, 2x/day
- I continued like this until 10 months, when I was able to stop pumping and just use my freezer supply to get her through her first year.
I didn’t need to make a huge supply to last me a lifetime, so I cut down on pumping sessions as often as I could, while still maintaining a “good enough” supply. If your goal is to make an overabundance, you’ll need to pump much more often!
When My Supply Dipped:
If my supply started decreasing, these things would always bring it up quick:
- a hoppy beer!
- Fenugreek (4x/day!)
- Mother’s Milk Tea
- Lactation Cookies (seriously, this worked well!)
Clogged Ducts:
I did get one clogged duct, and I’m pretty sure it’s because I was letting myself get so full by not pumping at night in the early stages. To get rid of it, I simply rubbed the spot while pumping and it went away!
Weaning
Weaning Baby
I weaned Everleigh around 11 months old and switched her to whole organic milk. I did it slowly over a week or two by mixing in 2 ounces of whole milk with 6 ounces of breastmilk for a few days, and then slowly adding more milk until it was all whole milk. Once we were at full milk, I did this ONLY in the sippy cup. We used the NUK brand because it has a soft tip and was a good transition from bottle-to-soppy, in my opinion.
We never had any tummy troubles doing it this way and were full off of breastmilk and bottles by 12 months.
Weaning Mommy
When it was time to stop pumping, I went as long as I could between pump session without exploding – which was about 16 hours the first time. Then I pumped it all out, took an over-the-counter sudafed, and went as long as I could again. I took sedated around the clock that day to help dry it up (just for about 24 hours). Since milk ducts are mucous membranes, any medicines that dry up mucous will also dry up your milk.
I was dried up within 2 days.
The first time I breastfed, with Hudson, I had a terrible time drying up my milk because I had no idea what to do. I ended up putting cabbage in my sports bra for the pain, and it took weeks before it felt any better!
BREASTMILK FAQS (How long can it stay out)
It’s important to never feed your baby old milk, of course, so always smell it first. You’ll CERTAINLY know if your milk has gone bad.
- Freshly Expressed Milk
- Lasts up to 8 hours in room temperature. You can smell it when it goes bad, it’ll be rancid. It depends on your milk as to how long it’ll stay fresh, so this could be 4-8 hours, but mine was definitely fresh still at 10 hours!
- At night during the early days, I would pump an 8 ounce bottle and feed Everleigh with it all night, so I didn’t ever have to get up!
- Ice Packs
- You can also store your milk in small coolers with ice packs in it for road trips, etc. It stays fresh like this for 24 hours. This is what we did on airplanes and other trips.
- Refrigerator
- You can keep your fresh milk in the refrigerator for 3-8 days. What I did was freeze all the milk and keep out enough in the fridge for 2 days at a time. This worked best for me and saved me the most space.
- I tried to use the frozen milk often so I didn’t end up with some milk from 10 months ago by the end, because our milk composition changes as baby gets older – it’s tailor made for their needs at each age!
- Frozen Milk
- 6 months in your regular freezer
- 12 months in a deep freezer
